How to Install and Use the Facebook Pixel: A Guide for Marketers
Do you run Facebook ads to promote your business?
Wondering how the Facebook pixel can help optimize ad delivery for specific goals?
In this article, you’ll discover how to install and use the Facebook pixel to track website traffic and create trackable Facebook ads.
What Is the Facebook Pixel?
The Facebook pixel is a piece of code you place on the backend of your website to track visitors to your site. The pixel allows you to run highly targeted campaigns, so it’s important to install it before running Facebook ads.
Each ad account gets one default pixel to use. The code is made up of two main parts: the pixel base code and event code. The pixel base code tracks all of the traffic to your site. Event codes are additional pieces of code you can add under the default pixel code to specific pages of your website that allow you to track certain actions on those pages.
Here’s a closer look at the types of event codes you can add.
- Search: If you have an ecommerce site, you can place the Search event code on a search results page on your site. For example, if someone is searching your site for “leather sandals,” you can add that term to the code for that results page.
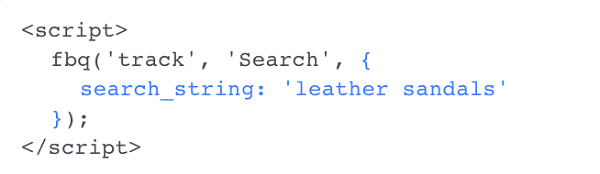
Place the Search event code on a search results page on your website.
- View Content: Place the View Content event code on a product page, for instance, to track views of a particular piece of content.
- Add to Cart: Include this event code on theadd to cart page of your website. If website visitors place items in their shopping cart but don’t complete the purchase, you can use the pixel data to run highly targeted ads just to those people.
- Add to Wishlist: If you have a wishlist option on your website, you can place this event code on the page to track the items people want most. Target them with a Facebook ad containing images of those specific items.
- Initiate Checkout: Place this event code on the page where someone begins the checkout process on your website.
- Add Payment Info: The Add Payment event code is triggered when someone adds payment information.
- Purchase: Place the Purchase event code on the thank-you page after people have purchased your product or service. If you have a new product coming out, you can design an ad for people who are already your customers.
- Lead: Use the Lead event code on the thank-you page after people have opted into a lead magnet or signed up for your webinar or newsletter.
- Complete Registration: Use the Complete Registration event code to track registrations to webinars, events, and so on.
- Custom: The beauty of the Facebook pixel is that you can customize it to meet specific business objectives. If you create a custom event, you’ll also need to create a custom conversion related to the event.
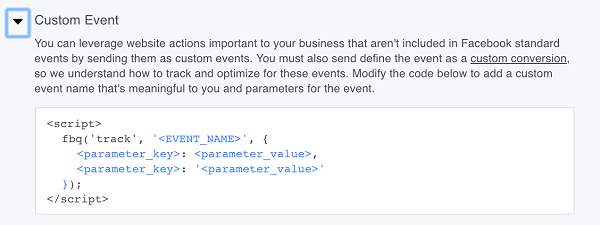
Facebook also gives you the option to create custom events.
These different pixel events allow you to gather data that helps you create successful Facebook ads and learn more about the people engaging with your website.
Basic, Recommended, and Advanced Installation Codes
Facebook gives you options for optimizing the event codes. You can install the pixel as-is or add your own parameters. Let’s look at the View Content event code, for example.
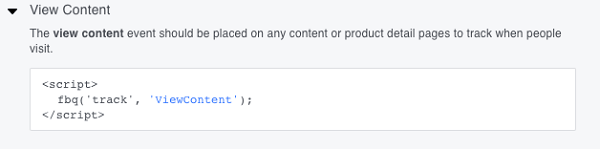
This is the basic View Content event code.
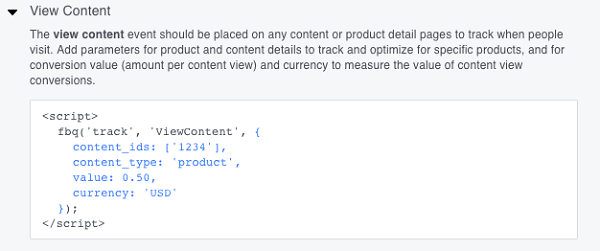
Facebook recommends that you add values at this level. You can add a few more details than the basic version of this code.

This is the recommended View Content event code.
You can get even more granular and allow the pixel to track very specific things.
This is an advanced View Content event code.
What if I Don’t Have a Website?
Surprisingly, you don’t need to have a website of your own to use the Facebook pixel. Many third-party websites let you install the pixel. Here are a few examples:
- Leadpages is a landing page website that allows you to create highly targeted website pages to send people to. You can design pages within the Leadpages platform and share them through Facebook ads, groups, pages, and even on other social media platforms. They work with the Facebook pixel to track visitors to these pages.
- If you use Everwebinar to do webinars for your business, you can install the Facebook pixel right inside your webinar setup.
- Teachable, a website for online courses, allows you to place the Facebook pixel on its website to track views and purchases of your classes.
These are just a few examples. As the Facebook ads platform continues to grow, the opportunity to install the pixel on third-party sites will grow too.
How Do I Create and Install the Facebook Pixel?
Now that you know what the pixel is, you’re ready to install it and begin using it strategically. Open Facebook Ads Manager and click the top menu button (with the three lines on it) and select Pixels from the Assets column. (Alternatively, go directly to the pixel page.)
In Facebook Ads Manager, click Pixels in the Assets column.
On the next page, click Create a Pixel to start the process.
Click the Create a Pixel button to start the process.
Add a name for your pixel and click Next.
Add a name for your Facebook pixel.
Install the Facebook Pixel Base Code
Next, you need to choose an option for installing your pixel code. You can use a Tag Manager plugin to install the pixel if you’re using a third-party website that supports this kind of integration. Or you can copy and paste the pixel code manually. If you don’t feel comfortable setting up the pixel yourself, you’ll have the option to email the code to a web developer or trusted friend.
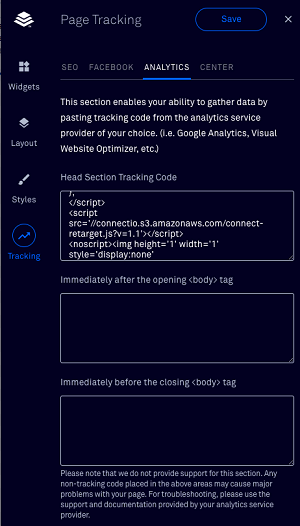
If you selected the option to copy and paste the code, you’ll see the Install Pixel Base Code page. Click in the code box to copy the codeto your clipboard. Now all you have to do is paste it in the header tags of your websiteunder the SEO settings. If you’re not sure how to do that, your web host should have instructions.
Note: The Advanced Matching option button allows you to gather even more data from your website, like first name and phone number. This is an advanced feature that’s typically used for ecommerce websites.
Copy the base pixel code and add it to your website.
If you’re using Leadpages or another third-party service, simply install the code the same way in the header tags of your page. Here’s an example.
Install the Facebook pixel code with Leadpages.
Install the Facebook Pixel Event Code
Click Next to get another snippet of code you install on specific web pages to track actions taken on those pages. As mentioned earlier, event codes allow you to create highly targeted ads and learn more about your audience.
Decide which event code you want to track. If you choose Complete Registration, for example, you can add the value of each completed registration to track specific pages further and create targeted ads in the future.
Select the event code you want to track and click in the code box to copy it. Then place the event code on the relevant pages of your website.

Copy the event code and then place it on the appropriate page of your website.
Click Next to proceed to the next step.
The final step is to test the pixel status. Go to your Ads Manager and select Pixels. If the pixel status is active, the pixel is installed correctly. It may take 20 minutes or so for the status to be updated.
How Does the Facebook Pixel Improve Your Ad Targeting
The goal of the Facebook pixel is to help you get to know more about the people engaging with your content. You can use this valuable information to create products and content that better appeal to that audience.
It’s also valuable for targeting your Facebook ads. You could target people who landed on a certain page of your website (like a blog post) but didn’t opt into the content upgrade.
Here’s an example of an ad targeting a custom audience and excluding another custom audience. Using the pixel, you can retarget people who engaged with your content but didn’t opt in, and exclude people who clicked through to perform the call to action.
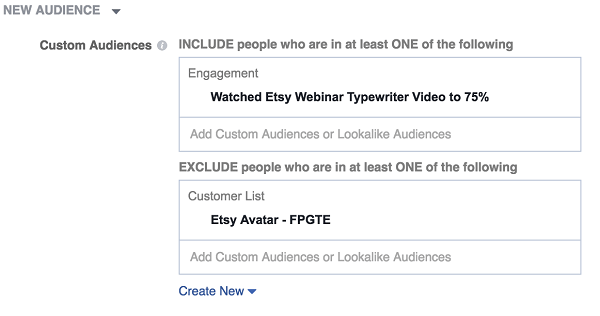
The Facebook pixel can help you refine your ad targeting.
The pixel can help you meet a number of specific objectives for your business. Here are a few examples of how you might use it.
Use the Pixel to Generate Leads
Facebook ads are commonly used by businesses to generate leads. For example, if you’re giving away a free item like a worksheet or checklist, you might run a Facebook ad campaign to deliver that offer to a targeted audience.
The pixel will track everyone who lands on the offer page. If people opt into the free resource, they get redirected to a thank-you page.
The Facebook pixel allows you to target people who visit a landing page but don’t opt into the offer.
Suppose you want to target another ad to a custom audience of people who clicked through to the landing page, but didn’t opt into the offer. To do that, target the ad to people who landed on the main landing page but didn’t land on the thank-you page.
You create custom audiences inside the Ads Manager. Decide on a strategy for how you’ll generate new leads, and use the pixel to track your specific objectives.
Use the Purchase Event Code to Track Campaign Results
Installing the Purchase event code on the web page where purchases happen allows you to analyze budgets for specific campaigns.
For example, suppose you set up a Facebook ad to drive people to a webinar registration page and sell a new product to everyone who signs up. Use the pixel to track all of the purchasesfrom the webinar and compare the total to your Facebook ad spend to analyze the performance of your campaign.
How to I Access the Facebook Pixel Data
Go to the Pixel page in Ads Manager to get access to analytics generated by the pixel.
First, you’ll see a graph of how many times your pixel has fired over the last 14 days.
This graph shows how many times the Facebook pixel has fired in the last 14 days.
Below the graph, you’ll find four tabs that help you analyze the pixel data. Here’s a rundown of what you find on each tab:
Events: View all of the event codes you selected each time you use the pixel. The green dot shows that your pixel is active.
The Events tab shows details for all of the event codes you’re using.
URLs: See the exact URL where the pixel is firing, as well as all of your third-party URLs. This data helps you gauge the popularity of a particular blog post or product page. You can view the last 14 days of your pixel activity.
Domains: Find out which domains your pixel is firing off of. This information is helpful if you have multiple websites or you’re using third-party sites. In some cases, you’ll see websites where your pixel isn’t installed. This is the referring website that sent someone to one of your website pages. An example might be your guest post on someone else’s blog.
Devices: See which device was used when the pixel fired. If you see that most people are using mobile devices to engage with your content, you can run only mobile ads in the future.
.Summary
The Facebook pixel is a very powerful tool, and developing a strategy to meet specific business objectives will help you understand how to engage with current customers and find new leads.
Even if you don’t have plans to advertise right away, installing the Facebook pixel will help you find out how people are engaging with content on your website. Install the base pixel code on your website and Facebook will begin tracking immediately.
Comments
Post a Comment